Showing posts with label organization. Show all posts

Saturday, September 7, 2013

Classroom Reveal

Well, we've been in school for 2.5 weeks now, and I'm finally getting around to showing off my classroom.

 Hopefully, as I settle into a routine, I'll find the time to post about this first few weeks.

Without further ado, my classroom...

First some, in the process pics:
When I walked in
Trying out desk arrangements


More desk arrangments
And one more failed try
 
At the end of Day 1
At the end of Day 2


And ... then I forgot to keep taking in progress pictures, but here is my classroom a few weeks later, many days of working in the classroom and about a week of teaching later:
From the door.  I finally decided on 2 groups of six and 5 groups of 4.

Classroom library, math board, mailboxes, computers, and whole class meeting area.
This has also become this class' favorite work area.
This is the corner that is cut off to the right in the picture above.

A shot from the library/whole group area.
I can't wait to do We're So Proud next week!  See my post here.

Directly opposite the door.
This is my One Class, Many Cultures Board (see post here),  Welcome board (this will be my science board once we start science), and my Prefixes, Suffixes, and Roots Word Wall (This is new for this year and I am so excited!)
My desk (which I made take up WAY less room this year!),
Student Supply and turn-in table (on the right),  math manipulatives (white drawers to the right
and bottom of book case - I love that these are accessible to students all the time now).
Close up of "the bookcase."
Top shelf: Daily copies, my Copy File Laminate box (with birthday pencils sitting on top)
Second shelf: My school's Character Building Books, a tub of things for helpers
(parents, middle school volunteers, etc) to do, and paper clips/push pins.
Third row: Master copies of things I use regularly, Sub Binder,
Folders to hold temporary centers, one tub of math manipulatives, and empty space.
Bottom Row: Math manipulatives that the students can use anytime
(although I guess we need to talk about putting them back since there is a missing tub!)
On top of the drawers is the prize box, raffle, and
Caught Being Good (school wide positive behavior system)

Front left of the room. 

Close up of the front left of the whiteboard.
This has our schedule and procedures we use daily, like our Morning and Afternoon Routine, When You Finish Early List, who the Lunch Helpers are, and who the Homework Checkers are.


The Reading Workshop (loosely based on Daily 5) board.  This is under the whiteboard.
I'm trying desperately to make productive use of that space,
but I'm worried that it won't be a visible enough reminder of what they need to do.

Trying out hand signals this year.  So far, we're only using the 1, 2, 3, 4 and me too.
 I started getting overwhelmed because I couldn't remember what each one meant,
so I had to turn around and look at this (it's above the whiteboard).
These posters are from Clutter Free Classroom
(but I had to print in black and white and color them - the printer and I were fighting)

I'm trying out mostly group jobs this year (the big circles) with just a few individual jobs
(the little circles with blurred out names).  I'm sure this will get a whole post later on!

Is there anything in my room you'd like to see me write a post about?


I hope you enjoyed looking around and that your school year is off to a fabulous start!


Sunday, August 11, 2013

Monday Made It - Reading Records, Bathroom Passes, and Organization!

The last Monday of summer.  Next Monday kicks off our school year (no students until Wednesday).  Of course, I'll be in my classroom all day today and at training for most of this week.  But, I'll pretend it's still summer.

The rapidly approaching school year has kicked my butt into productive mode though, so I've got a few Monday Made-Its to share!


First up, Bathroom Passes:


At the beginning of each month, I give each student a bathroom pass with the word "bathroom" on it.  Each letter is a pass.  When they need to go, I cross out a letter (of course, we still have the talk and expectations about when appropriate times to go are).  At the end of the month, unused letters become tickets for our raffle.  This is the system that all 4th grade has used at my school the past two years.

I like to have the name of the month on the bathroom passes.  Some of my teammates just rotate through the colored paper we have, but I could never remember which color I was on.  So I made one for each month.  I'm going to copy them all as soon as our copy machines are up and running so I am ready!


Next, Reading Records:

I gray out the days that they do not have to get their log signed (weekends, including Fridays, and days off of school).

Parent signed reading logs are expected at my school. My first year and a half, I used a half sheet of paper each week that students had to write how many minutes they read each night and have a parent sign.  I HATED collecting them each week and would often forget to make sure I had copies each Monday.  So, part way through last year, I switched to monthly logs.  It's still just minutes and parent signatures, but I only have to collect it once per month.  Most of the kids really liked the calendar aspect of it! I made the fonts match the bathroom passes and I'll copy them on the same colored paper (one of those cute, but doesn't matter things, I know).


Would you like to use these too?

Click HERE for the link to the bathroom passes and reading records.  All days are white on this reading log since I don't know your schedule :)


And last, some cute organization:

Label shape from Ladybug's Teacher Files; Font: Oh {Photo} Shoot
I used lots of Mod Podge to stick those cute papers on!
They match my turn-in boxes nicely (though I wish I had found this paper before I made those!)
I decided to do Copy, File, Laminate instead of Copy, File, Grade for a couple of reasons:

  1. It's just not realistic to think that my grading will all fit in that drawer :(
  2. I feel like I always have some small little thing that needs laminating but doesn't seem worth turning on the laminator, so I save it for later, when I have a bigger job.  BUT, then I forget or misplace that small thing.
Alright, I'm off to my classroom now to see if I can get it ready enough to show you all tomorrow for Teacher Week '13!

Monday, August 5, 2013

Monday Made It - Clips Galore!

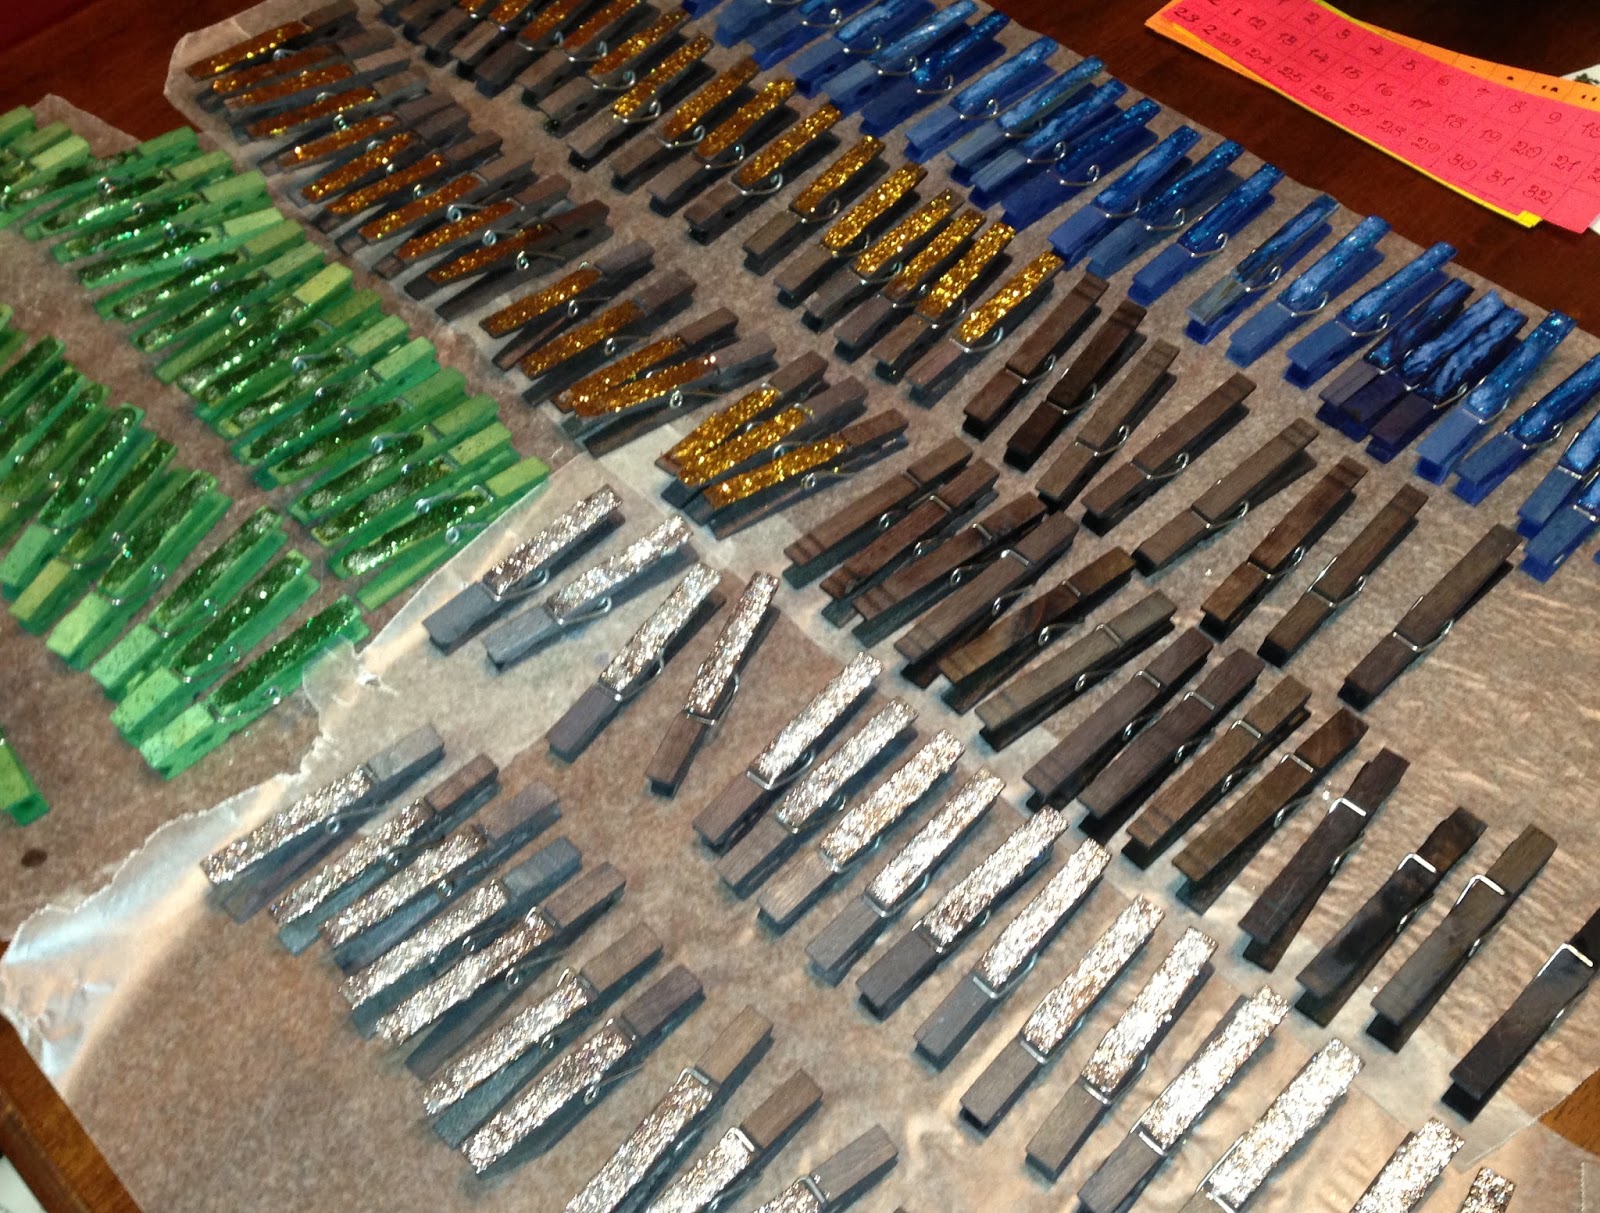
After a summer of slacking on school things (and just organizing when I wasn't), I finally took on the biggest and most important crafty project of my summer - making all of my behavior clips!  I've posted about my behavior chart before here and here, but here's the quick run down:  When a student ends the day on "Excellent Effort" (side note: I'm thinking about switching the order of Role Model and Excellent Effort - what do you think?), he/she gets to put a sticker on his/her clip.  When there are 6 stickers on the clip, he/she gets a new clip.  The new clip is a new color.  My kiddos last year loved it!

And ... now I am all set for this year, even if every single student gets all the way to the elusive GOLD GLITTER CLIP!!!

I'm linking up with 4th Grade Frolics for Monday Made-It to show off my work and give you some tips if you are planning to color and glitter any clips!


First, I dyed the clips using Rit dye.  If you're using warm water, it takes 15 minutes to an hour to get good color (depending on how much dye you put in and how deep you want your color to be).  If you're using room-temperature water, it takes a LONG time (overnight worked well).  I used warm water from the tap for the first batch of each color (so the dye would dissolve) and then reused the same dye-water for the rest of the batches.

Note: Wood floats.  Don't be like me and think that if you make it deeper, it will cover the whole clip.  
It won't. You've just got to turn then every once in a while.
Then, they had to dry.

Next up, GLITTER (for those superstar students who get to their 5th or beyond new clip).  

Because of the glitter I had, I used two different methods.  Here are my pros/cons of three methods (one I did last year as I scrambled to make clips mid-year):

Hot Glue and Loose Glitter:
Pros: Fast
Cons:  Doesn't look as great, some glitter falls off

White Glue, Loose Glitter, and Sealant:
Pros: Pretty
Cons: Count the steps and supplies needed (put on glue, spread it around, put on glitter, shake off glitter, let dry while you painstakingly try to clean up the glitter, spray with sealant, let dry)
 
 
And ... maybe it is the sealant I chose or my spraying technique 
... but my fingers were still covered in glitter after handling these.
Glitter Glue:
Pros: It looks pretty and there's no glitter to clean up.


GLITTER GLUE FOR THE WIN!
Seriously, I don't think I will ever do 
any more clips with loose glitter.
The loose glitter and glitter glue ones drying in peace (and some plain black ones sneakily preparing for the next step).
Side note: It seems like the poor red ones always got left out of the pictures :(

Last, glue on numbers so they are good and ready for your Behavior Superstars (I actually did this before the sealant on the loose glitter ones and it worked just fine).

And, without further ado, the finished product:
Each color is in number order on a scrap of cardboard.  I think this will keep them nice and tidy.
Students get a plain clip on the first day of school (upper left), then black, blue, green, red,
red glitter, green glitter, blue glitter, silver glitter, and finally gold glitter.

I have at least two extras of each color (I guess I wasn't so hot at counting on this ... but extra extras can't hurt!), so I'm clear for at least two new students to come mid-year.  Being prepared will make it not happen, right?!?!

What have you made lately?  

Head over to 4th Grade Frolics and link up!

P.S.  Really, do you think I should switch Excellent Effort and Role Model?  I'm torn!


Monday, July 22, 2013

Monday Made It - I Can! (Freebie)

Where, oh, where has this last month gone?  It has been a blur of wedding planning, family vacations (I met a ton of my fiancé's cousins that he hasn't seen since he was little or had never met), and general relaxing. 

I feel like I've hit school count down mode now - one month from today is the first day back with the kiddos!  Yikes!

I know I won't get everything done that I had hoped to this summer, but I've got a few things that I still really want to get done:

  1. Organizing master copies (hard copies and digital files) - I know this will make my life easier.  Plus, I have two friends who are switching from kinder and first to 4th this year, plus two teammates new to 4th grade, and I want to be able to help them!
  2. Map out Language Arts - I kind of hodge-podged language arts together last year.  With switching to common core, I don't think I can do that this year!  I need more structure.
  3. Make behavior chart clips - see my post here
  4. Make "I Can" objective statements for all four subject areas.
Yay! One thing crossed off of the To-Do list.  I'm linking up with 4th Grade Frolics for her Monday Made It to share these with you!


I typed out all of the CA Common Core Language Arts, CA Common Core Math, CA Social Studies, and CA Science standards as "I can," "I know," or "I understand" (I tried to avoid these last two as much as possible because they aren't actions students can show, but the way some of the standards are written, I couldn't figure out how to get around it).  

As I read each standard, I tried to picture teaching it and what baby steps we'd have to take to get there. I put those on separate cards.

Once I can get back into my school, I am going to back each one with colored construction paper, laminate, and put a magnet on each one.  I'm not quite sure where I will display these, but it will most likely be on  the whiteboard.


Do you want to use them too? Click on each subject you want:  ELA, Math, Social Studies, Science

Typing all of these up really helped me realize how much we teach in a year! Wow!

Where/how do you post standards/objectives?  How do you/students interact with them?  I'm going to try to post and use them much more this year than I have before, so I'd love your tips!

Tuesday, June 18, 2013

Tried It Tuesday - NEON Binders

As I stalked read blogs last summer, I saw many ideas for organizational binders for students, including many cute acronyms.  I posted some thoughts about it last summer here.  And then, I TRIED IT!  (however, as you clearly know from my lack of posts over the past months, I was a bad blogger this year.  I don't have pictures of my kiddos' binders.  I hope you'll forgive me!)

(and am therefore linking up with Fourth Grade Flipper's Tried It Tuesday)


I decided on N.E.O.N as my acronym (as my classroom color scheme is black with neon colors).  It stands for Navigating Everyday with Organization and Neatness.  I got this particular acronym from Ginger at Ginger Snaps, though my binder was very different.  One major difference is that these binders never left the classroom.

Here's the cover, which each student colored.  32 identical binders?  They definitely needed names and a bit of personality! Most of them were into the neon idea and used highlighters.  They turned out cute! (Bad Blogger, Bad Blogger)
Click the picture to go to the Google Doc.

Inside, we put three folders, all labeled (with cute labels that I cannot seem to find an electronic copy of right now).  
  • Each student had a red folder.  One side was labeled "Ready to Turn In" (see my post linked above for why) and the other said "Miscellaneous."  (New vocab word for some students on the very first day of school!)
  • Each student had a blue folder for Language Arts.
  • Each student had a black or yellow (their choice - because I couldn't find enough black ones) for social studies and science. (I alternate teaching these two, so students never need both)

What students kept in them:

  • Front Pocket of Binder: Bathroom Pass, Daily Behavior Log
  • Red Folder: Work ready to be turned in and work that didn't "fit" anywhere else
  • Blue Folder: Any work in progress for Language Arts, especially Writing Workshop and Reading Workshop papers
  • Black/Yellow Folder: Any work in progress for Social Studies or Science
  • Back Pocket of Binder:  Any work that involved construction paper (you know how it's too big to fit in folders?  Well, it fits here!)

What I liked:

  • Students' desks were more organized than last year, when they just had folders in their desk.
  • Many kiddos felt like they were organizational super stars.  They bragged to other classes about them.

Needs to Be Improved:

  • Wow, did some kiddos accumulate work/papers in there!  I tried having a whole class clean out every other week, but the kiddos who needed it the most didn't really pay attention.
  • Some kiddos (those same ones) jammed paper in, so it wasn't organized, papers were crinkled, and it was just a MESS!
  • The holes on almost every students' folders ripped during the year.  Major pain to deal with. (Cute story side note:  I had a about six students who at the beginning of the year were an academic mess - no organization, no effort, nada.  I worked with them and their parents very closely to get them on track.  All but one made huge progress.  When students were cleaning out their desks at the end of the year, I commented to one of the successful ones that I was amazed at the great condition of his NEON binder.  His response:  "Well, you know how at the beginning of the year ... well, I wasn't as good at being a good student and I never used my binder.  So really, it's only half a year used."  It made me smile to be reminded of how far he had come and that he knew it!)

The Verdict:

Better than the folders from the year before, but not everything I'm looking for.

Will I Do It Again?

Not the same way.  My teammates and I have already talked about having school-to-home binders this year, so NEON binders may still exist in my room, but their purpose will be different.  I blog about it more once the idea is more settled in our minds.


What have you tried?  Go link up with Fourth Grade Flipper and share!


Monday, June 17, 2013

My First Monday Made-It of Summer 2013

Today marks the start of my productive summer.  I've spent most of the time over the past three days watching movies (we went to see Man of Steel - I was SO bored for the second half of the movie), TV shows on Netflix (I'm a bit late to The Office), playing video games, reading blogs, and just generally being a bump on a log.

Well, no more!

Today starts my summer of:

  • wedding planning
  • exercising
  • eating healthy
  • working on school projects
  • finally finishing setting up my apartment (almost two years into living here)

I did get started on the first of my Summer-To-Do-List for school - ORGANIZING MASTER COPIES.  That means I have something to link up to Tara's Monday Made-It!!!

The first step in making organization that you'll actually use is making something cute (or at least decently nice looking), right? 

 I have decided to use binders.  I'll go more into my reasons once this project is finished, and I can proudly present the final product.  Therefore, my first step was making covers and spine inserts for my binders.  Now, these aren't the cutest things in the world, but once they are printed on brightly colored paper and lined up in a neat row on my book case, I think they will look plenty pretty enough to make me happy.  I also made a page to put in the front of each binder that lists the standards covered in that binder and some of the bigger, overarching standards (especially those in Common Core).  I am really trying to focus on the standards rather than the curriculum, especially for the coming year with having to use our old curriculum to meet Common Core (plus, my team-mates and I found this year that the activities we come up with to meet the standards are almost always more fun for students than the curriculum's).

Here's the whole document - 71 pages!
Fonts: Oh {Photo} Shoot by Kevin and Amanda, Tekton Pro Bold, Tekton Pro BoldExt.
Border :  From the Pond http://frompond.blogspot.com    

An example social studies binder - the front has the topic and the over -arching standard.
The next page is the full standard and the chapters in our textbook it relates to
(this will be the first thing in the binder) and the last page has Analysis Skills we
are supposed to teach all year long (it will be on the back of the standards page).
Social Studies and Science Binders have California State Standards.

An example for math.  I split these up by Common Core domain.
Down at the bottom of the last page are the 8 Mathematical Practices, just to keep them in my brain!
Math binders have California Common Core (so, Common Core plus CA's additions).

An example for Language Arts.  Again, the last page has the broader Common Core standards.
Language Arts binders have California Common Core

My Language Arts spine inserts.  I decided not to make them full
length because it is so hard to get a full length one in, am I right?!?!?

Would you like to use these?  

Click HERE to go to the PDF in Google Docs.  Click HERE to go to an editable Word Doc in Google Docs, so you can edit (though I'm not sure how well the formatting will transfer - make sure you have the fonts downloaded)!

Happy Monday!  


Sunday, June 16, 2013

Summer Time and the Livin's Easy


Whew!  This has been a hectic seven months.  I can't believe it's been that long since I posted.  I bet most of you thought I was gone for good.

Now that the school year's over, I'm back.

Next year, I'll try blogging the whole year.  Wish me luck.

A quick recap of November - June (with more details likely to come in later posts):

1.  I got engaged!!!!!!  We aren't getting married until next summer, so I haven't started planning yet, but now that school is out, the planning is ON!


(nothing else on this list is going to come close to that level of exciting, at least to me, so hence the font size decrease)

2.  I successfully survived my second year of teaching, with me being the second most experienced with 4th grade on my team (and therefore having to step up to leadership roles) and having one team-member transferred mid-year (followed by a train of subs as they searched for a replacement).

3.  I finished BTSA.

4.  I didn't get a pink slip (hey, big deal for a second year teacher)

5.  I said good bye (making them promise to visit, of course) to an absolutely amazing group of kiddos. I think that this will be one of those groups that stands out as one of my favorites for my entire career. 


Now, for my summer plans ...

This year, I'm trying to keep my school summer to-do list shorter.  Last year, I was so overwhelmed by everything I wanted to do that I did very little of it.  That, and I have a wedding to plan! :)


  • Organize master copies
  • Make "I can" statement posters for all standards (especially Common Core Math and Language Arts, but also Social Studies and Science)
  • Map out Language Arts (I meant to do this last summer.  It's even more important now that we are switching to Common Core this year)
  • Make a Teacher Toolbox (yep, I didn't last summer)
I've seen SO many great ones.  This inspiration is from Mrs. Tina's Tots.
  • Make a Copy, File, Laminate box (my take on the Copy, File, Grade box that's been all over lately)
Again, so many great ones.  This inspiration is from 4th Grade Frolics.
  • Work on Social Studies Units (I completely re-did one social studies unit this school year, and the kids LOVED it.  They cheered for Social Studies time, rather than groaning.  WIN!)
  • Make Behavior Chart colored clips
  • Figure out how I'm going to organize myself next year (lesson plans, grading, student info, meeting notes, etc)

What's on your summer to-do list?  Any advice for any of mine?